
Spark Makerspace
3D Printer Certification
3D printing is a type of additive manufacturing that creates objects layer by layer. There are several different types of 3D printers, but at Spark we only use plastic filament Fused Deposition Modeling (FDM) printers. Sometimes you’ll see the acronym FFF which stands for Fused Filament Fabrication. Other types of printing might use liquid resin or a powder and lasers, and so the process is messier and more hazardous.
The process to make something on one of Spark’s 3D printers involves these high-level steps:
There’s also a section in this guide about what to do when things go wrong.
We’ll go into these steps in more detail during the certification so you can see how they all work.
Okay. Let’s start at the end of the process and talk about how the printer actually does its thing.
3D printing using plastic filament involves heating the plastic until it’s melty and pushing it through a small opening in a brass nozzle. The plastic that’s extruded will lightly bond to the printer’s build plate or strongly bond to the previous layer of plastic that was extruded. Doing this layer by layer, the 3D printer constructs the object.
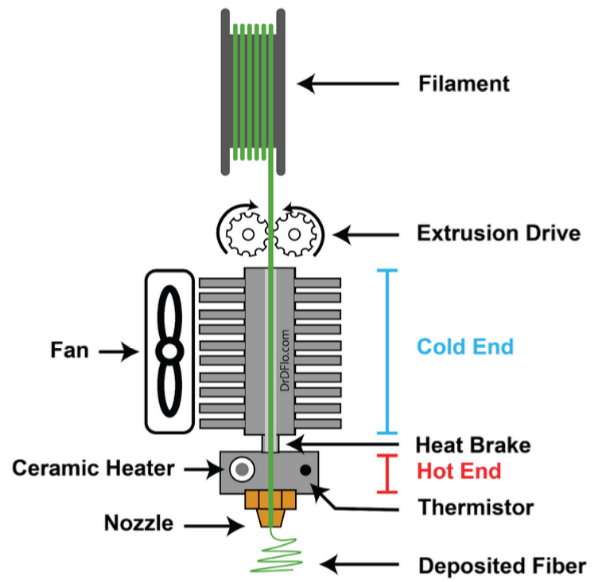
[Image from https://www.drdflo.com/pages/Guides/How-to-Build-a-3D-Printer/Extruder.html]
The 3D printer is instructed how to build the object by reading commands one at a time from a gcode file. These commands are not easy to read and could be something like “G1 X23” which means move the nozzle 23 mm in the X direction. Thankfully, we don’t have to be able to read or write gcode to use a 3D printer.
The first main step is to prepare the printer.
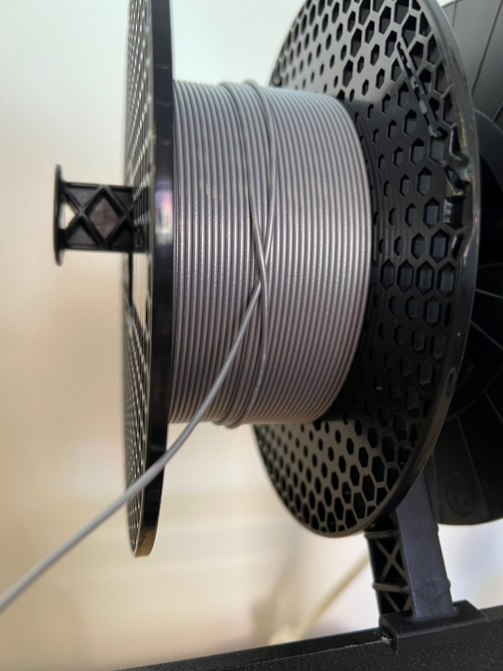
Important! Don’t let the free-end of the filament spool go. This risks a tangle in the future and potentially equipment damage!
Important! Don’t let the free-end of the filament spool go. This risks a tangle in the future and potentially equipment damage!
This is what a tangle looks like in case you ever see one

Open Orca Slicer if it’s not already running.
If it is already running, start a new project to reset all of the settings. If asked to save whatever was open, choose Cancel.
Orca Slicer’s interface
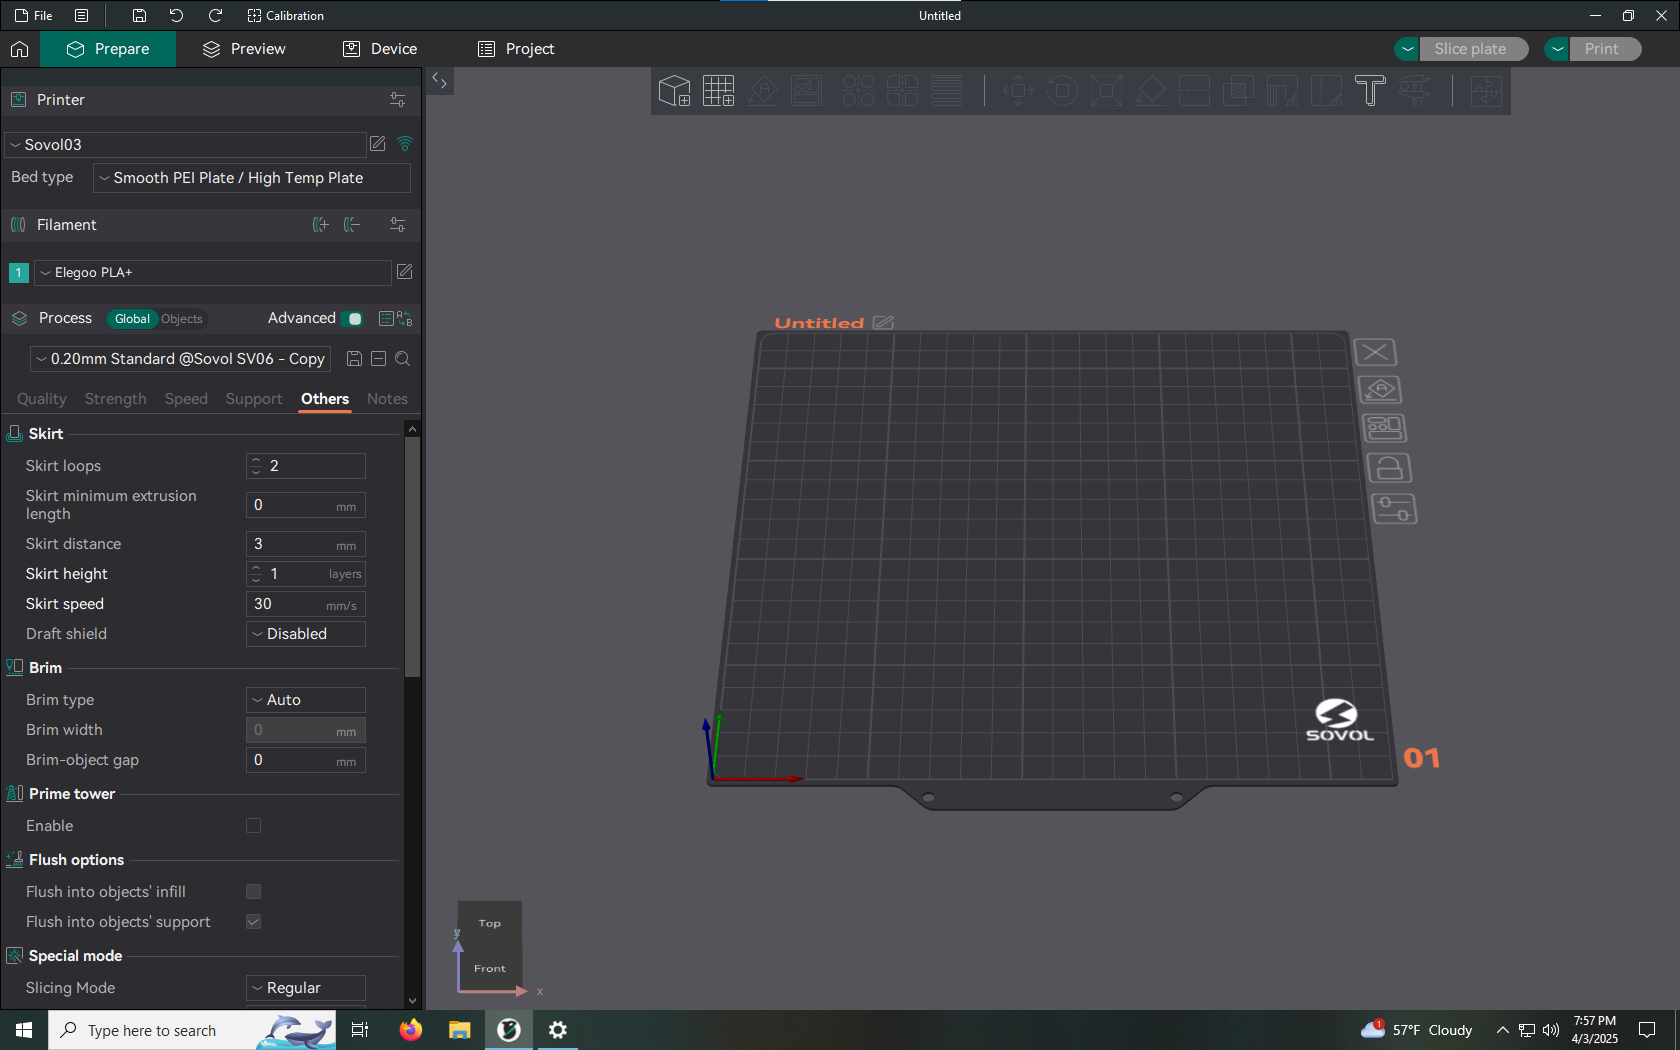
On the left side of the window are a whole bunch of settings. Don’t feel too overwhelmed, there are only a few that you need to change depending on what you’re printing and where you’re printing it.
Most of the window shows you the object(s) you’re going to print.
There are tabs at the very top of the window. These tabs represent different steps involved in printing.
| Prepare | Preview | Device | Project |
This tab allows you to place and arrange objects for slicing. You can move, resize, and rotate things freely. |
This tab shows you what the sliced G-code looks like. Things aren’t editable here. Like a Print Preview when 2D printing. |
This tab shows you the controls for the printer. Here, you can pause a print, cancel a print, or make adjustments while printing. | Apparently, you can create a project with multiple prints or something. I’ve not used this. |
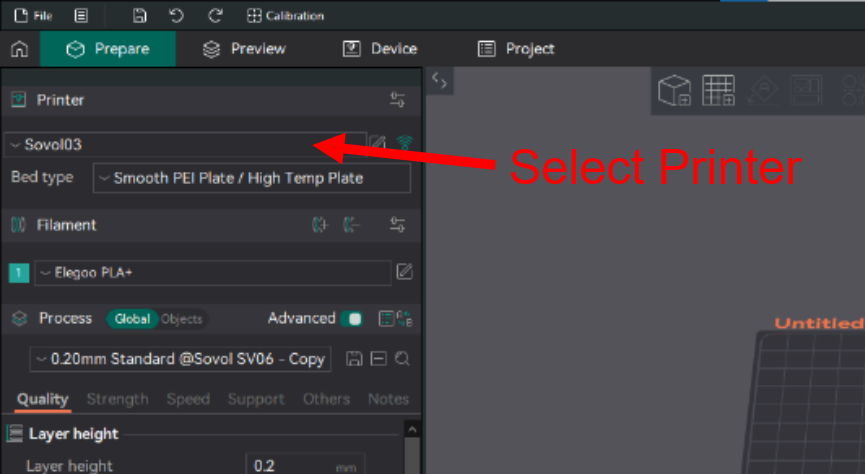
The first place to start is to figure out which printer you want to print to and select it.
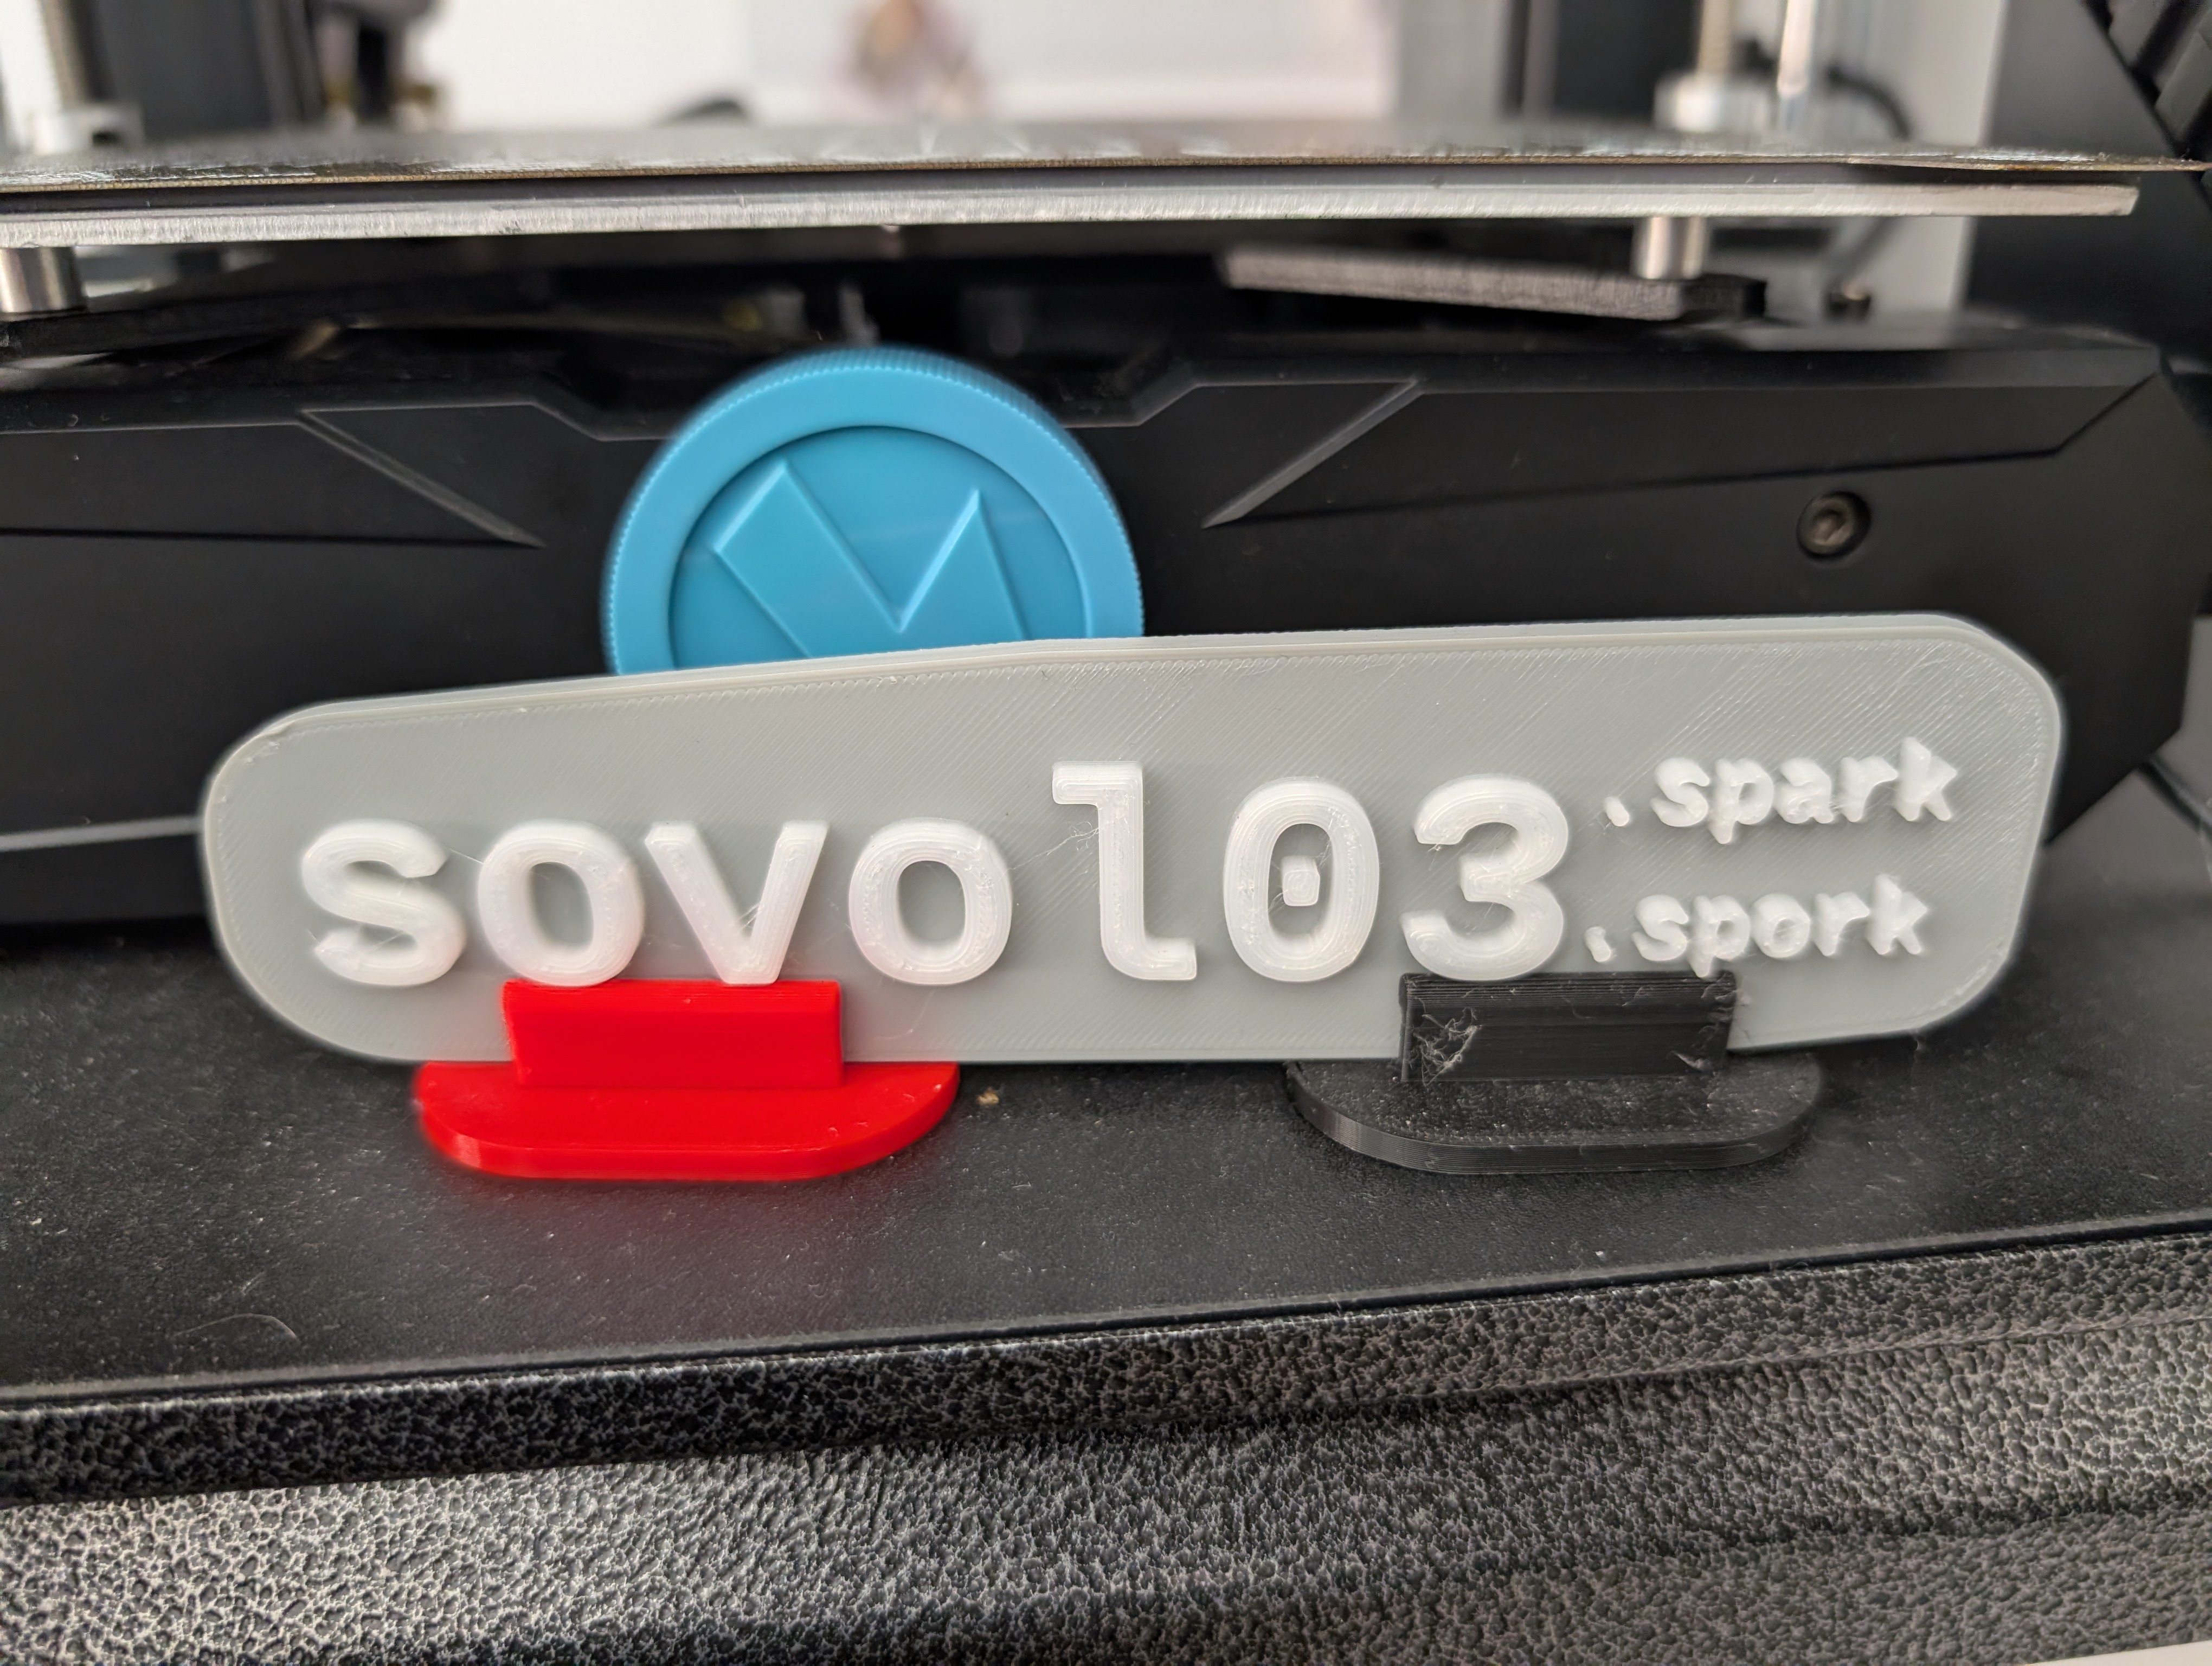
Which printer you select is up to you. There are name plates in front of each printer on the shelving unit so you know what’s what.
Next, let’s make sure you’re using the right starting settings. This guide assumes that you’re printing with PLA+, which is the filament material normally used on our printers. If you’re using a different material, you’ll need to choose different option.
Choose the “Elegoo PLA+” filament settings and then the process preset of “0.20mm Standard @Sovol SV06 – Copy”. These are sane starting points. Never save over these presets – which is not covered in this guide anyway.

At this point, you’re ready to grab your model and add it to the build plate. If you don’t yet have a model to print, check out one of the 3D model repositories in the Resources section. OR you can design your own. Check out one of our intro to CAD classes to get started with CAD.
Find your file either in the Downloads folder or on a flash drive and open it. Orca Slicer will put it in the middle of the build plate.
If you selected more than one file, they’ll all be placed in the center of the build plate – overlapping! Make sure you separate them from each other manually or use the arrange button.
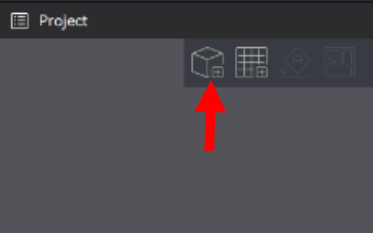
The Auto-Orient button and the Arrange button

These two buttons can get you out of a lot of trouble. The Auto-orient button will rotate an object so that it’s most likely to print well with the smallest amount of support material. Support material is plastic that is printed to support parts of the object that are just hanging in free air. It’s stuff that you’ll have to break off after the print is done.
The Arrange button will allow you to automatically spread out multiple objects near the center of the build plate.
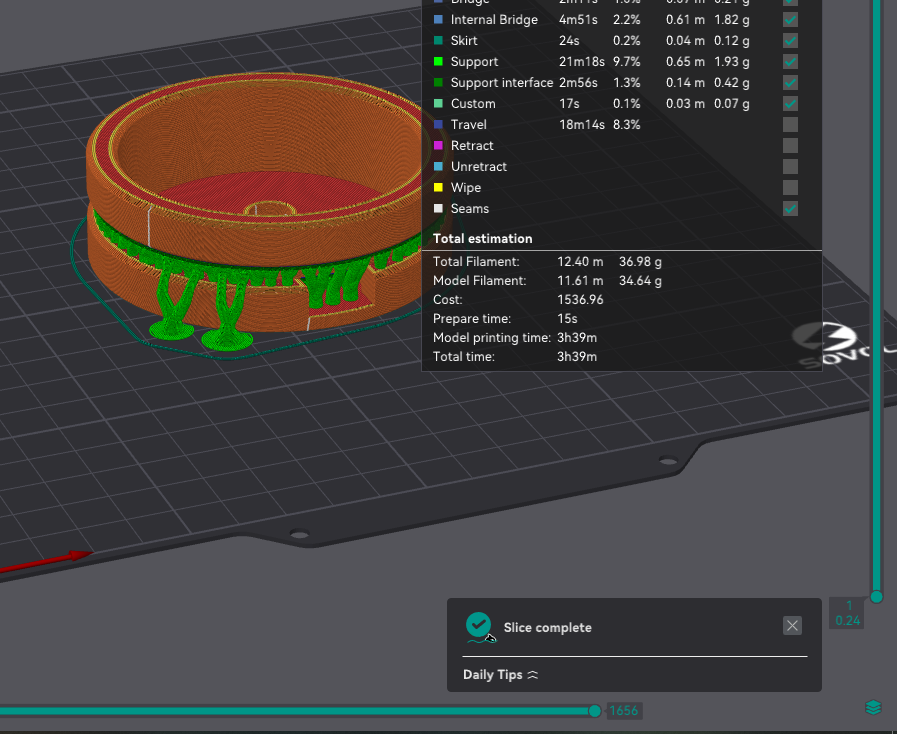
To slice, click the “Slice plate” button. This will automatically move you to the Preview tab. Once it’s done, you’ll see how the 3D printer would extrude plastic to make your models.
A sliced model in the Preview tab
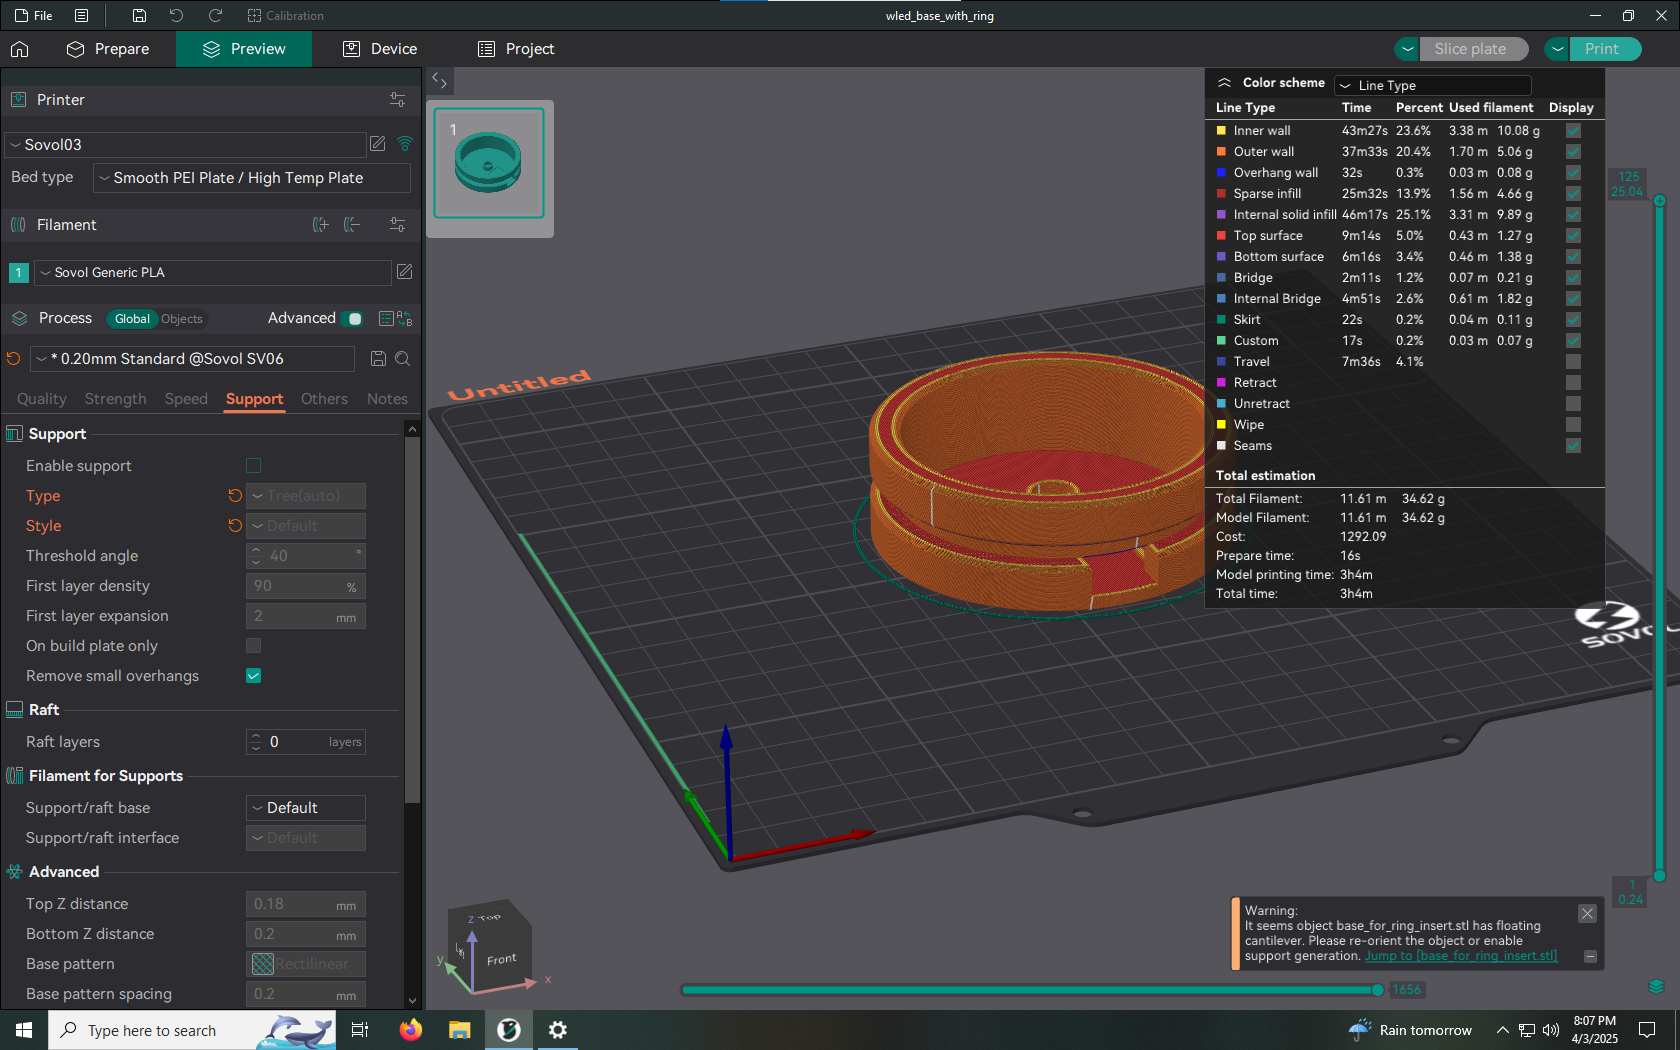
Let’s explore the things you can see on this tab. In the middle is a 3D representation of the generated G-code. There are check boxes that allow you to toggle on or off specific features. You’ll also see estimates of the amount of material and the print time.
In the bottom right corner is an area where you might see warning messages. Pay close attention to these.
 This
warning says that there are floating areas of the model that need
support. If you were to ignore this message, your print will certainly
fail.
This
warning says that there are floating areas of the model that need
support. If you were to ignore this message, your print will certainly
fail.
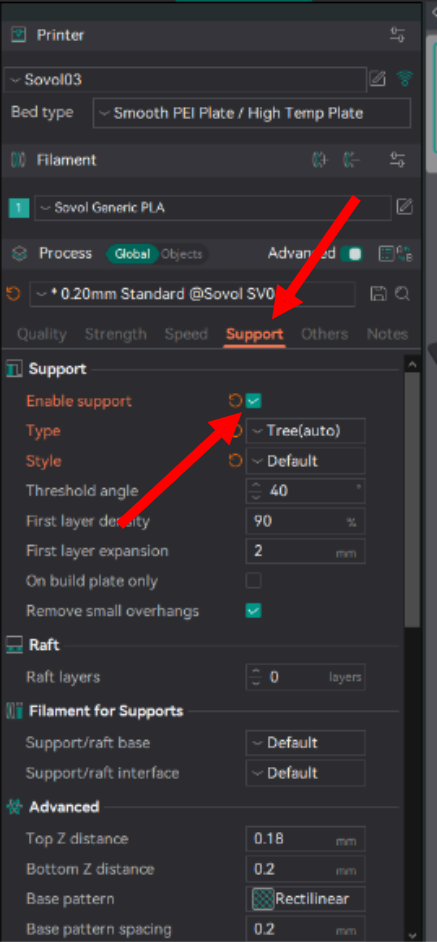
To support floating areas, you need to turn on support material. You’ll find this checkbox in the Support tab of the settings.
The Enable Support checkbox Annoying support material, but at least there’s no warning!
Any time you change print settings, you’ll need to hit the “Slice plate” button again. Once everything looks good, you’re ready to...
This step is just two clicks. Click on the “Print” button at the top right of the window. Then “Upload and Print”. You can switch to the Device tab to see the process begin and so you’re prepared to cancel the print if something goes wrong.
At this point, the printer should start whirring and moving.
This tab looks very different from the rest because you’re actually looking at a web page hosted by the printer. The dashboard is the only view that you need to print, so this guide won’t cover the other tabs on the left side. Additionally, there are a lot of controls on this page that you shouldn’t touch, so I’ll only go over the parts you might use.
The Device Tab
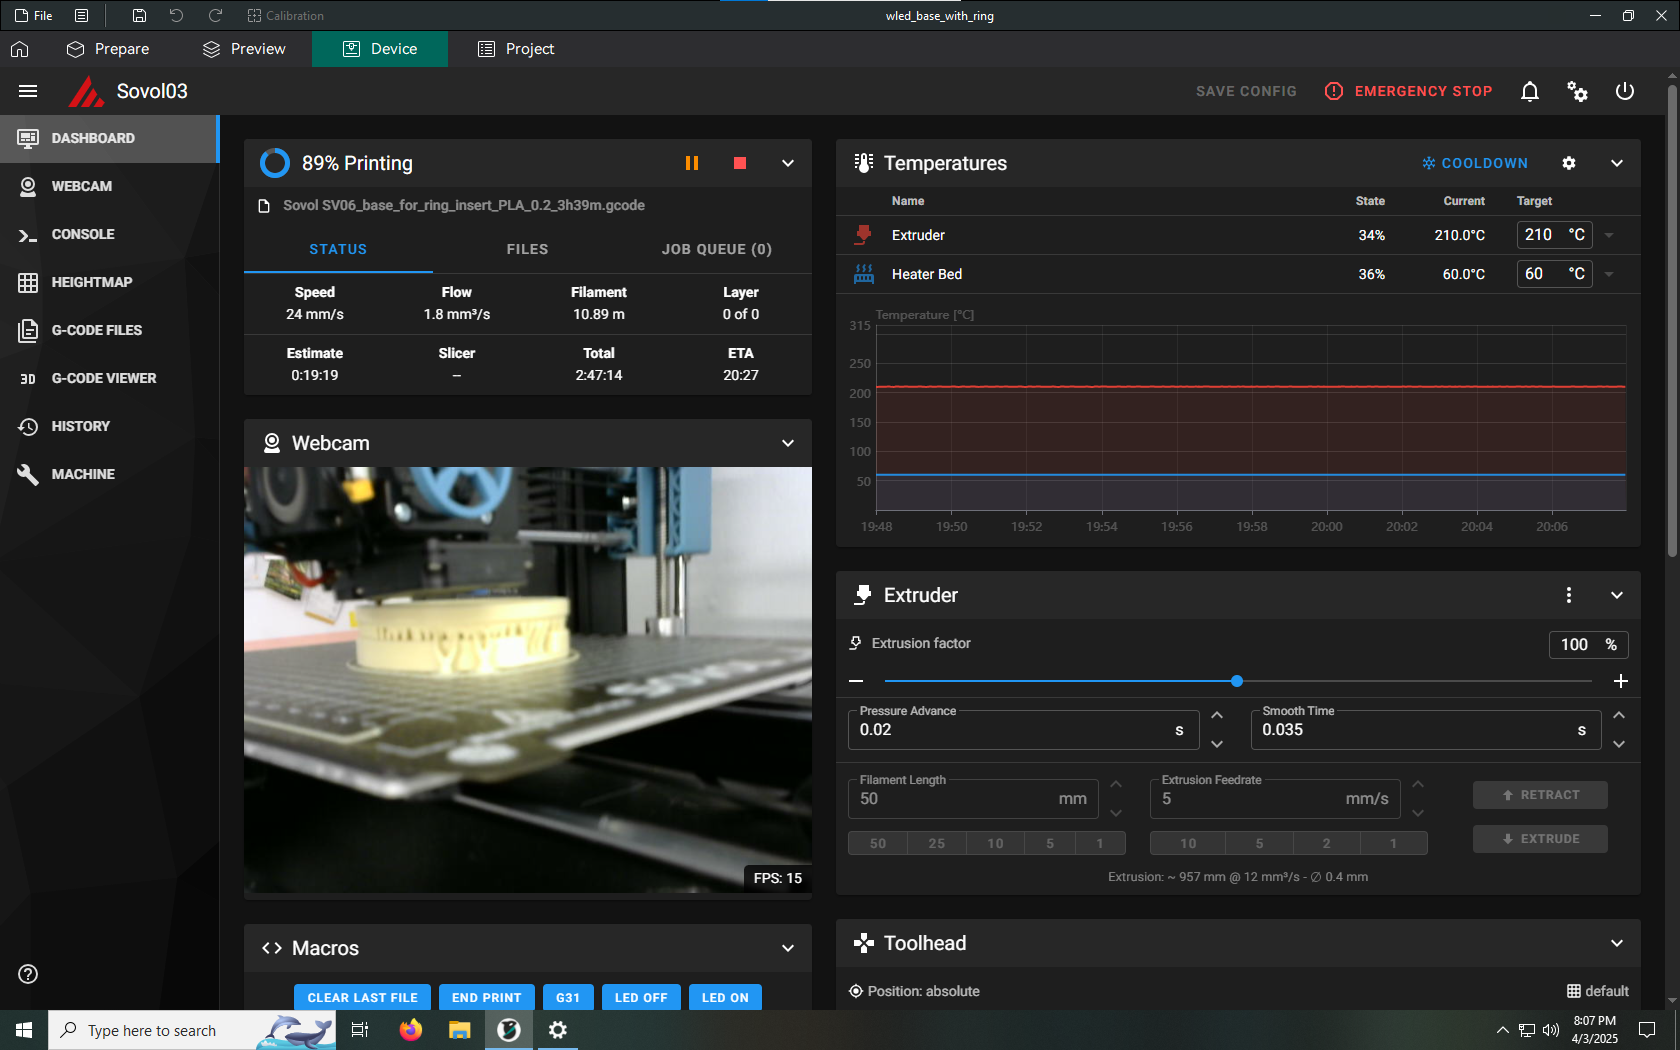
This button is in the top right corner of the Device tab. It will immediately stop the printer and cool it down. This is the button to hit to stop the printer if the printer might damage itself or if someone is in danger. Using this button will cause the printer to enter an unusable state until the firmware is restarted.

For other ways to stop the printer, see the Pause and Stop buttons in the Status Panel and Uh Oh! section further on.
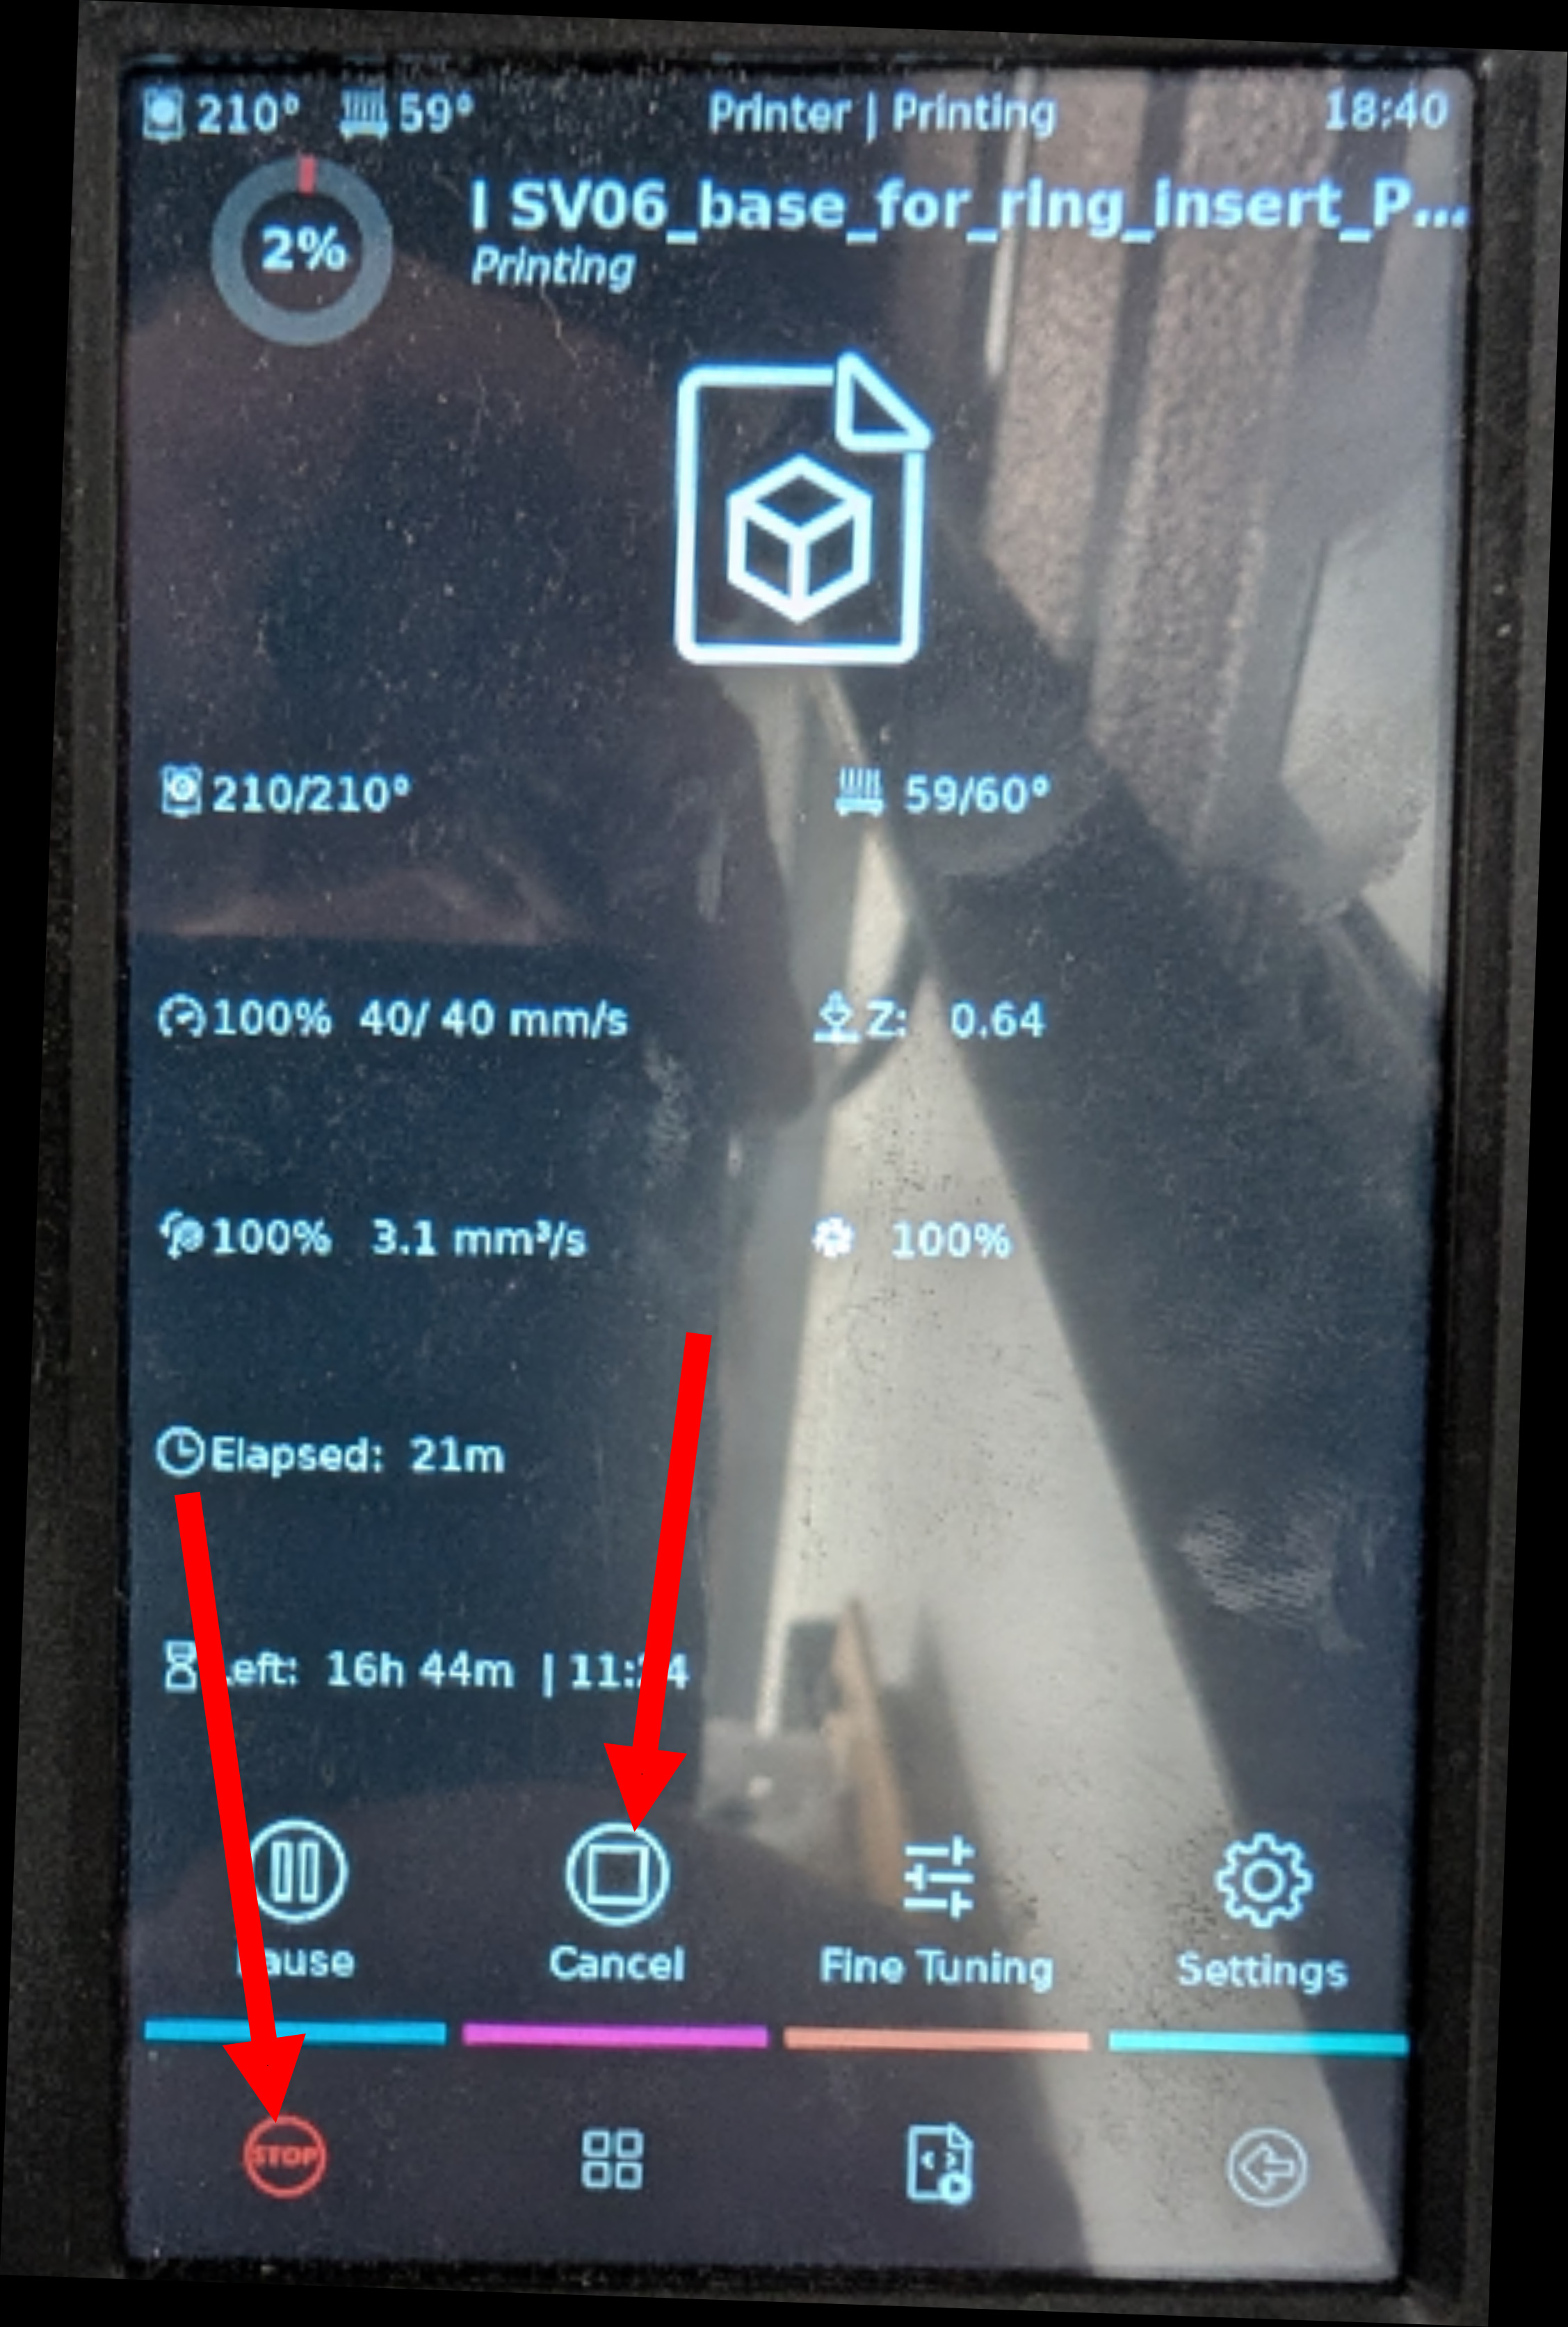
This area provides information about the current print and two buttons: one to pause the print and one to stop the print. If you pause the print, you can then resume it, but this may ruin your print. The Stop button will cancel the current print.

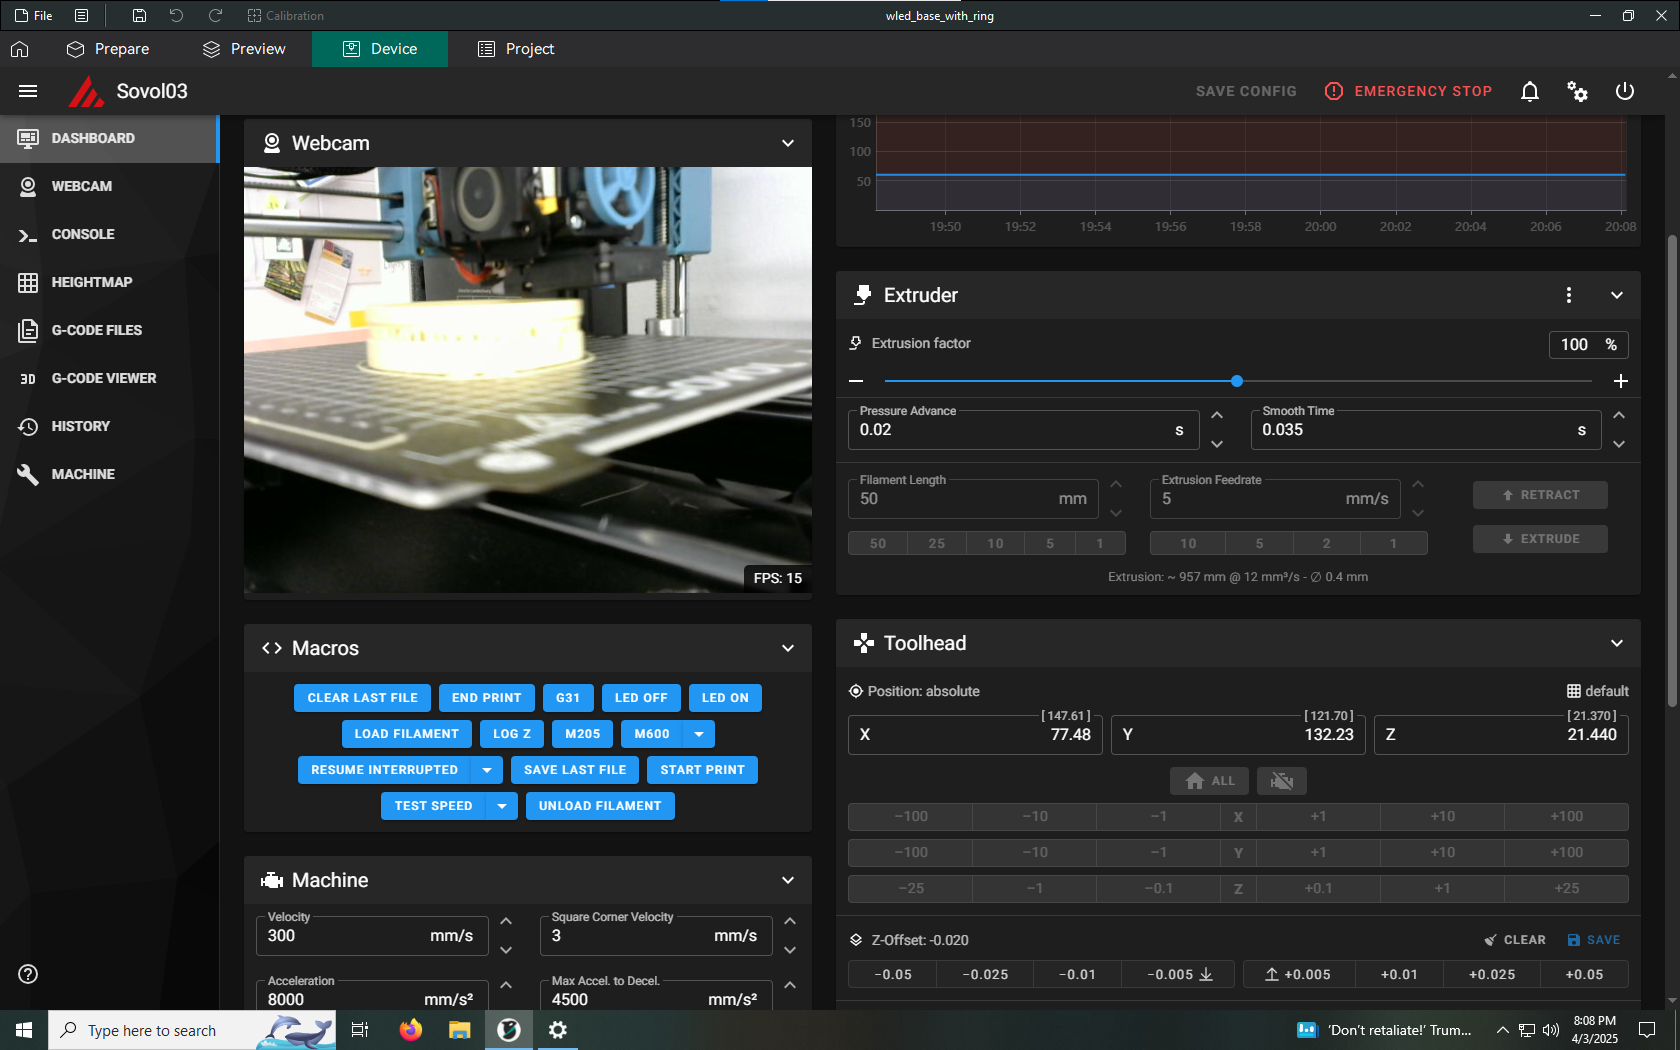
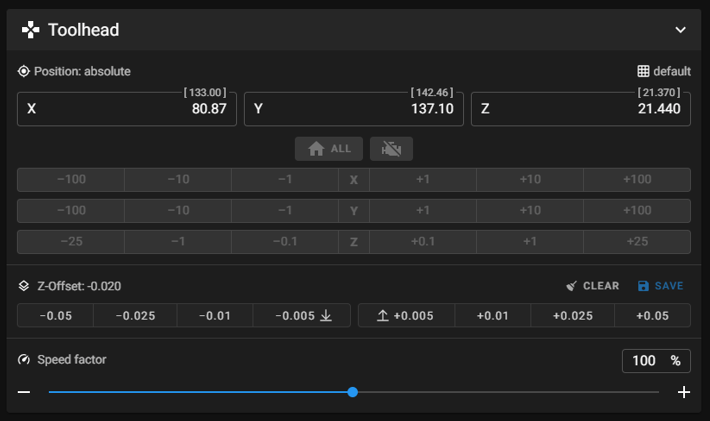
During a print, all of the buttons on this panel are grayed out except for the Z Offset buttons. These buttons allow you to move the nozzle up or down slightly to adjust the SQUISH. More on that in a little bit. There’s also a slider to adjust how fast the printer is printing.
The first thing you need to do is watch and listen. If the printer is making any sounds or movements that seem “wrong”, then you should probably hit the e-stop button. Especially if it continues to make that sound/movement.
While the printer is printing the first layer, you should watch and adjust the Z Offset if it seems off.
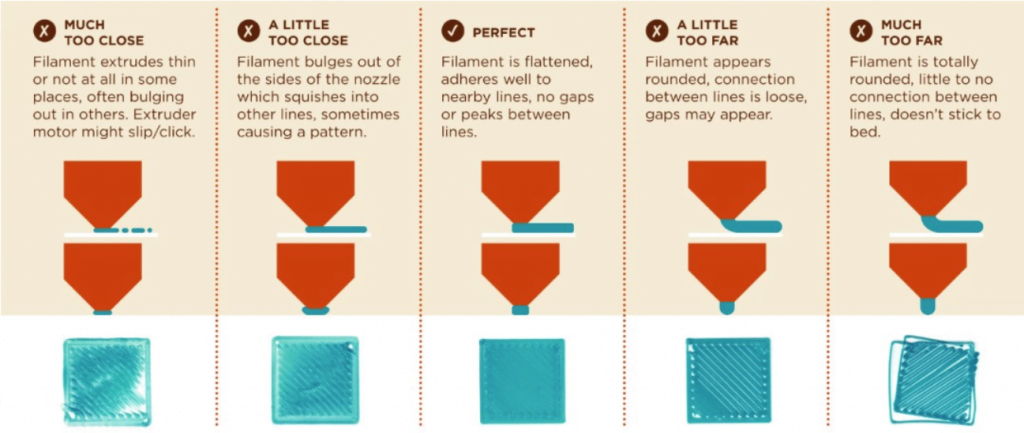 Squish
Guide
Squish
Guide
This setting should normally in good shape, but if it’s off at all you can use the +/- 0.01mm adjustment and then the +/-0.005mm for fine adjustment.** Be careful not to adjust the Z Offset too low or you may gouge the build plate.**
Most prints that will fail if the first layer doesn’t print well, so you are required to stay and monitor the first layer for problems. Cancel the print if things go wrong with the first layer.
After the first layer is done and if it looks good, you’re free to leave the printer by itself. If the first layer shows any signs that it’s not printing well, stick around for another layer or two until things get worse or things get better.
For more on what can go wrong during a print and what to do about it, see Uh Oh! a bit later.
Your print finished and you want to take it. WAIT! You should wait for the build plate to cool down a bit. Taking the print off too soon can cause the bottom of it warp. After about 5 minutes or longer, you can pick up the build plate and flex it to pop off your print.
Make sure to also remove the priming line. Then wipe the build plate with some alcohol so it’s clean and ready for the next print.
3D printers, like 2D printers, are finicky, spiteful, and vengeful things. To operate correctly, they need two things: filament, and a user’s fear that it’ll start producing large amounts of unwanted plastic spaghetti. As soon as you assume it’ll work correctly and stop worrying, that’s when things will go wrong.
Always be looking out for behaviors and sounds that aren’t normal. If something does mess up, find the relevant section below and follow the instructions.
If a printer seems to be broken, put an OUT OF ORDER sign on it and email the electronics leads at [email protected] or send a message in the #electronics-and-tech-lab on Spark’s Discord server.

 Uh oh,
there’s an OUT OF ORDER sign on the printer!
Uh oh,
there’s an OUT OF ORDER sign on the printer!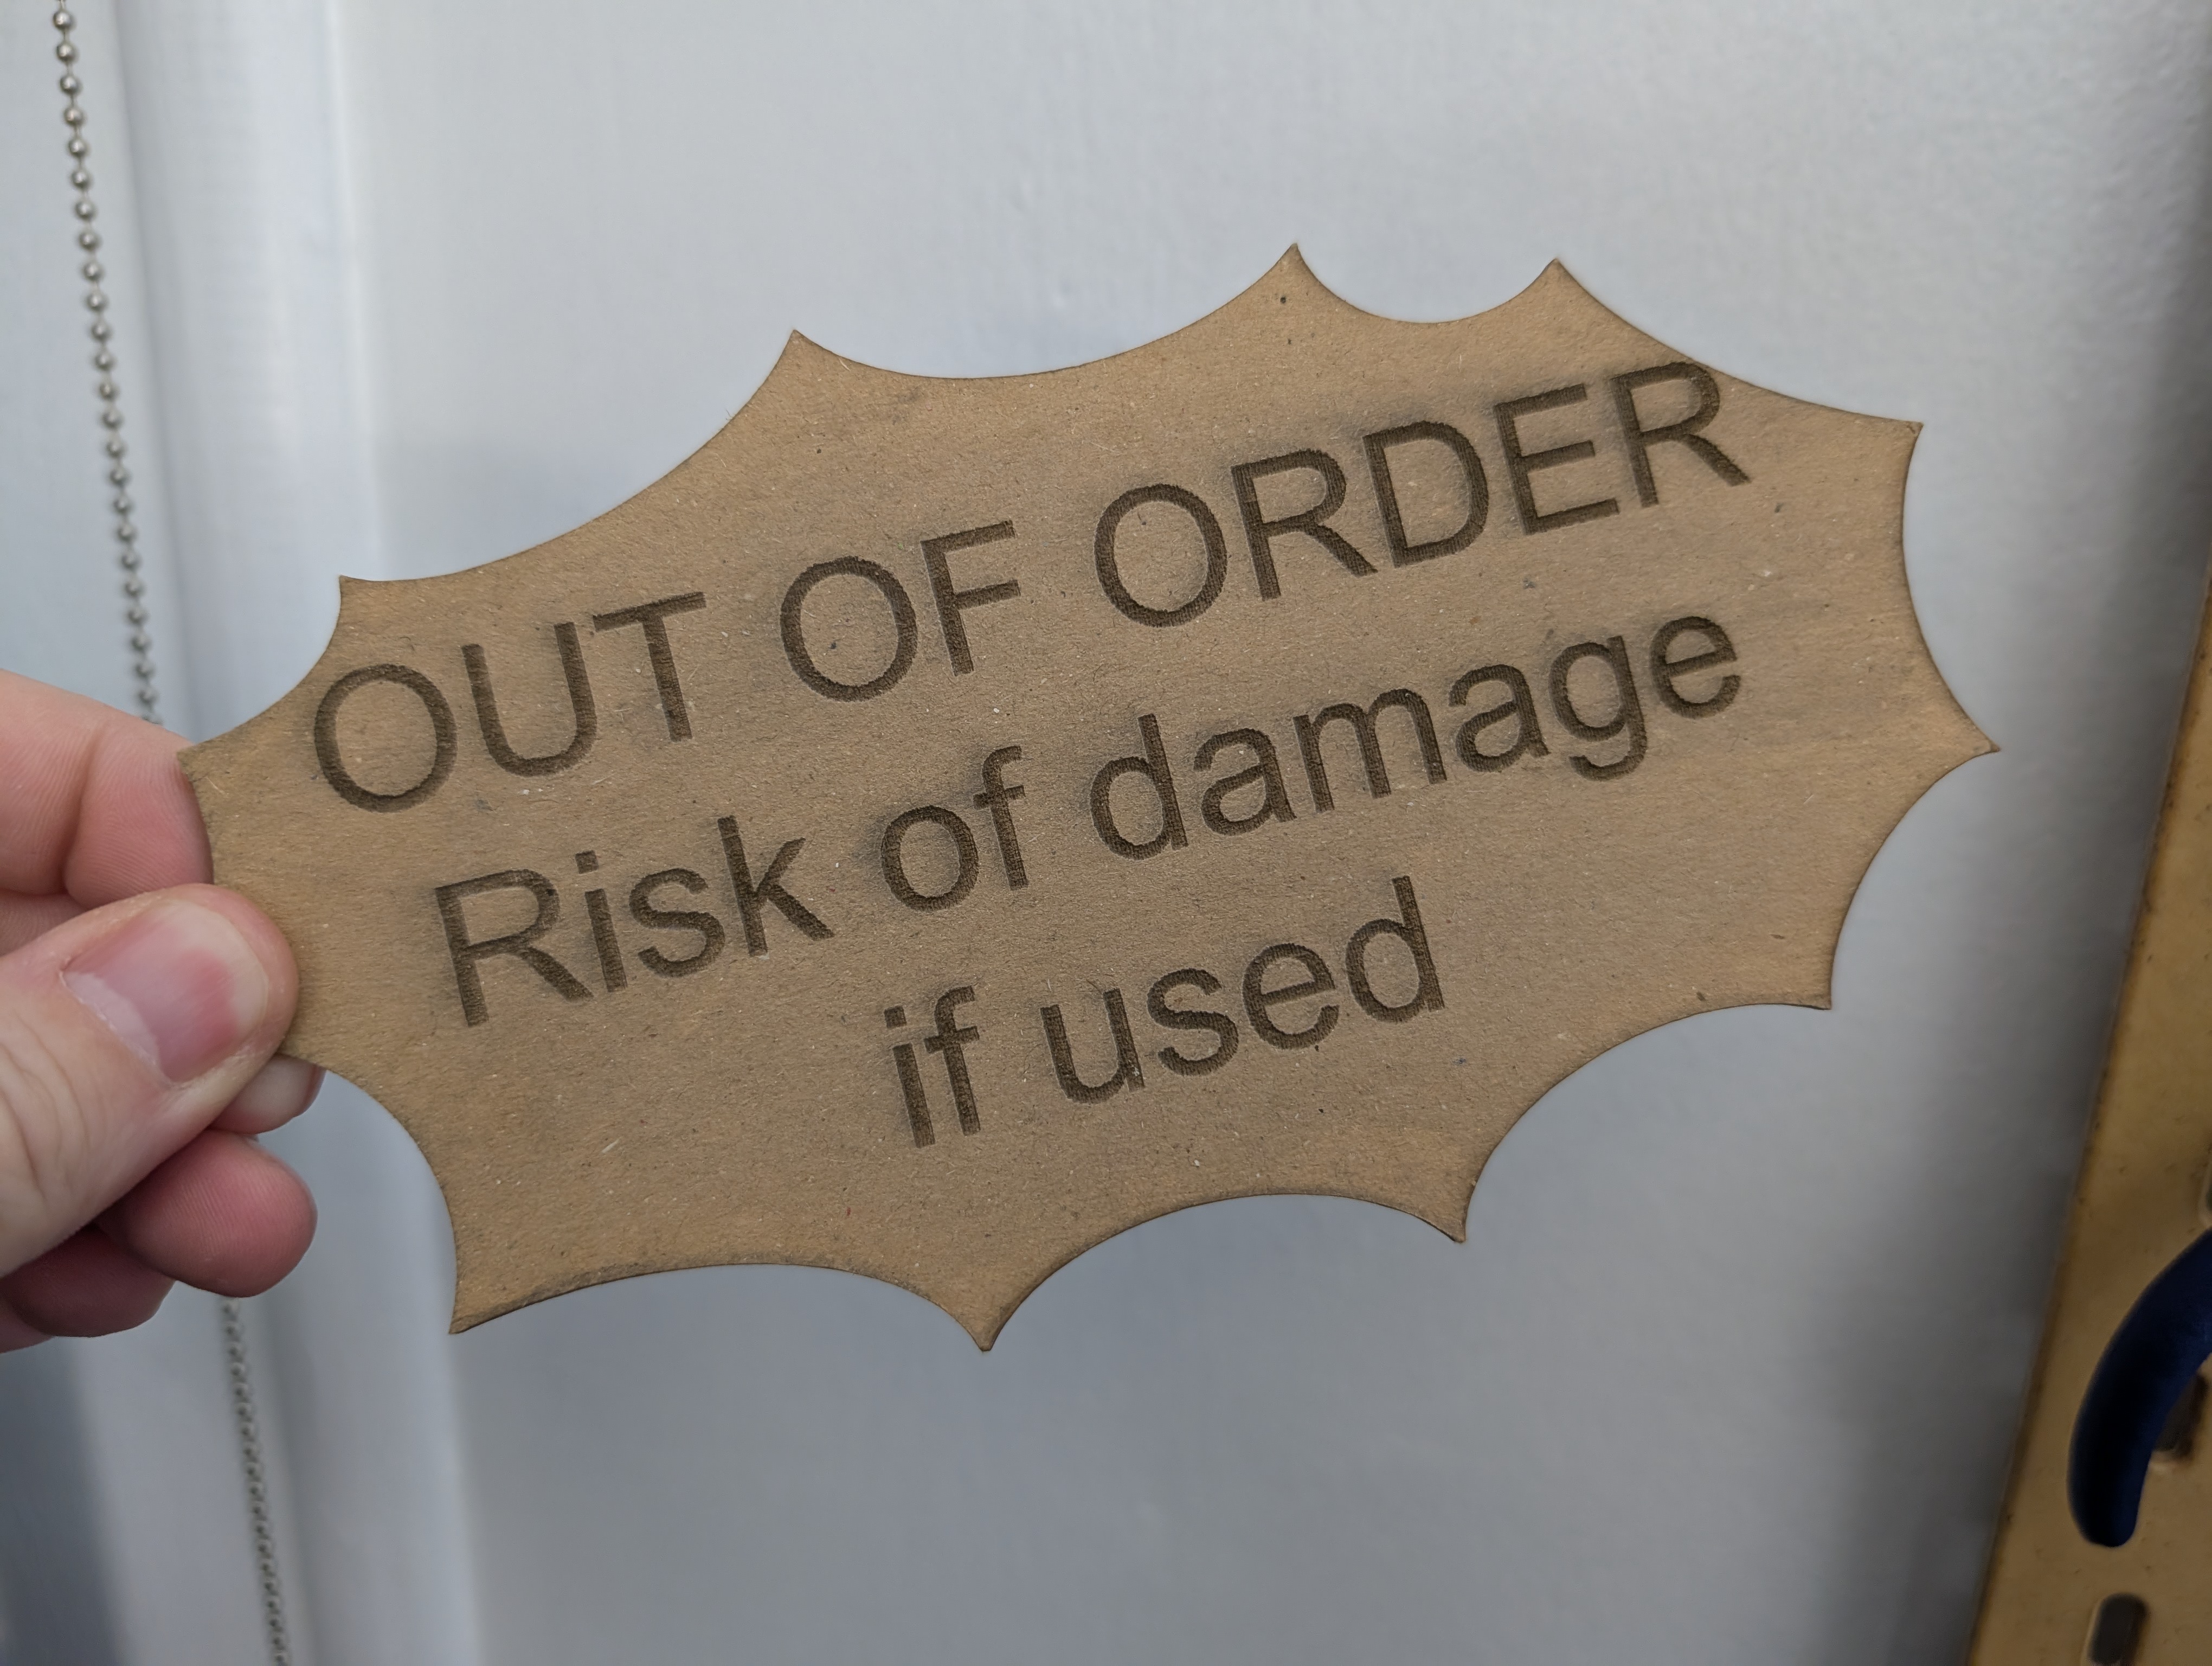 Obviously,
you shouldn’t use the printer if this sign is on it. If you do, you risk
permanent damage to the printer and/or creating a dangerous situation.
Only leads may remove this sign when they’ve ensured that the printer is
ready for service again.
Obviously,
you shouldn’t use the printer if this sign is on it. If you do, you risk
permanent damage to the printer and/or creating a dangerous situation.
Only leads may remove this sign when they’ve ensured that the printer is
ready for service again.
If you need to mark a printer as OUT OF ORDER, please let the leads know via email or Discord.
There are a couple of reasons why this might happen. First, the build plate might have oils or residue on it and need to be cleaned. Stop the print, clean off any plastic stuck to it, and then wash the plate with soap and warm water. Fully dry the plate before reinstalling on the printer. Try to avoid touching the build plate because that can deposit oils from your fingers.
The second reason may be that the nozzle is too far away from the build plate. Use the Z Offset buttons in the Toolhead panel on the Device tab to make small adjustments during your first layer. Be careful to only make small adjustments or you might end up gouging the build plate.
This is the opposite of the last problem. The nozzle is probably too close to the build plate. Use the Z Offset buttons in the Toolhead panel on the Device tab to make small adjustments during your first layer. Be careful to only make small adjustments or you might end up gouging the build plate.
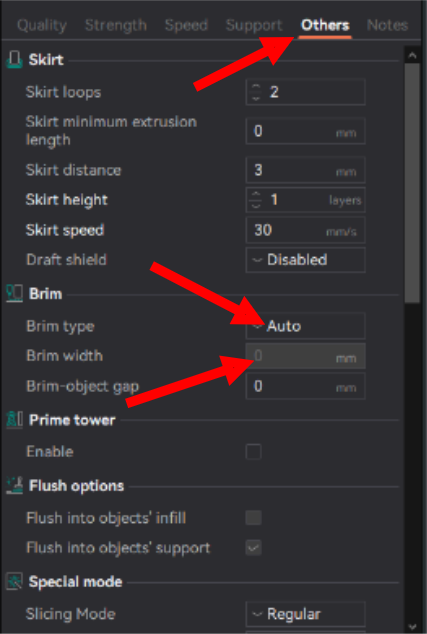
Once it happens, things can only get worse. Stop the print immediately. Clean all the plastic off the build plate and then wash the build plate with soap and water and then dry it and reinstall. This helps with build plate adhesion because it removes any oil or residues. Other things that can help with build plate adhesion is to print with a brim. A brim add plastic around the edge of the first layer to increase surface area in contact with the build plate.
Find the brim settings in the Other section on either the Prepare or Preview tabs.
If you can live with the warping and it doesn’t seem like the whole print will come loose, you can let the print continue. Otherwise, you should stop it and try the suggestions in the previous Uh Oh.
The nozzle is probably clogged. Stop the print and place an OUT OF ORDER on the build plate. Email or Discord message the leads to let us know.
In general, if it seems like the printer might be damaged, use the emergency stop. If you just need to make some adjustments and try again, stop the print and make your adjustments and try again. If something seems broken, let us know and throw an OUT OF ORDER sign on it.
Bonus ways to cancel a print or E-stop the printer!
You can use any filament in our collection of partial spools or new spools, although we’d love to get through more of our partial spools before opening more. The open spools of filament can be found in plastic bags in the bin on the bottom shelf. The new spools are found on the top shelf and are usually boxed. As of when this guide was written, Spark only stocks PLA+/PLA Pro (they mean the same thing) and some limited quantities of PLA.
We have quite a collection of various spools that have been donated, so feel free to use what we have. When we start to get low on the donated open spools, we’ll ask that users of the 3D printers purchase and supply new spools for community use “when you start to feel guilty about the amount of plastic you’re using”.
Feel free to purchase whatever colors you need for your projects. Check out the Resources section for some brand suggestions.
Our printers will only print filament with a diameter of 1.75mm. We don’t have the ability right now to print with abrasive filaments, but we could install an upgrade if users want it enough. Send us a message if that’s you.
You may also want to use a color or material we don’t have available. As far as materials go, we recommend for most applications that you use PLA+ or PLA Pro. The upsides are:
The downsides are:
When considering other materials, you’ll need to work with the leads to make sure that we can print it at Spark and then we need to develop a profile for the material.
Place PLA in the bin labeled “PLA Only” and place PLA+ or PLA Pro in the bin labeled “PLA+ Only”. If you’re not sure what it is, use the “PLA+ Only” bin. We don’t have definite plans for when these bins fill up… there may be some filament recycling facilities that would accept it.
There are folks on the internet who pelletize scraps and heat them in silicone molds to make stuff. There are other folks who heat press them into plates and use them as a material for future crafts. Still others have figured out how to reheat and re-extrude scraps into recycled filament.
We welcome any/all ideas especially if someone has the drive to follow through and make it happen.
The leads take care of necessary maintenance, but if you spot an issue, make sure you let us know.
Our printers will only print filament with a diameter of 1.75mm. We don’t have the ability right now to print with abrasive filaments, but we could install an upgrade if users want it enough.
| Name | Type | Platform | License | Ease of Use | Notes |
| OnShape | Parametric | Web-hosted | Commercial | 8/10 | Free accounts only allow creation of public projects. Projects are stored in the cloud. |
| Autodesk Fusion | Parametric | Windows | Commercial | 8/10 | Free hobbyist accounts have advanced features locked. Projects are stored in the cloud. |
| FreeCAD | Parametric | Win/Mac/Linux | Free Open Source | 4/10 | Free and open source, but complicated to learn/use. |
| OpenSCAD | Code-based Parametric | WIn/Mac/Linux | Free Open Source | 3/10 | If you love code and can visualize how to combine shapes and operations to produce an end product, then you’ll like this. Can be used to create or modify fully parametric models. |
| Blender | Mesh / Sculpting | Win/Mac/Linux | Free Open Source | 6/10 | More useful for artistic work than engineering. |
| TinkerCAD | Solid Modeling | Web-based | Free Closed Source | 9/10 | Easy to use, but less powerful than parametric CAD. Combine basic 3D shapes using various operations to create your model. |